|
|
|||
|
|
| LiftAmerica Conversion | Downloads | Enrollment/Assessment | Kiosk Use Guide | Login Guide | Troubleshooting | Kiosk Testing |
|
Failure Messages and Hardware Problems
Using the Testers To use the testers, login to the Admin screen and click the General Tools button. Click the Help link and select the Kiosk Testing link in the left navigation. Click on the link for the desired test.
Test Keyboard Access
Having access to the kiosk keyboard or an on-screen keyboard will make testing easier. If the kiosk keyboard is not plugged in or you desire to use the on-screen keyboard, begin by touching the Start button in the lower left of the screen. Click Programs, then Accessories, then Accessibility, then On-Screen Keyboard. The keyboard can be dragged to any position on the screen using the blue/gray bar (where the ‘On-Screen Keyboard’ title is located).
This keyboard will respond to touch just as the standard program keyboard does and will allow you to easily enter numbers into the Hand Sensor (BIA) tests. Be sure to click the X in the upper right corner when testing is complete.
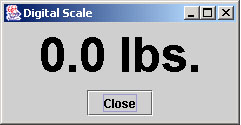
Scale Failed – Digital Scale Tester
This test can be entered from this page and is also available on the Kiosk Testing page, directly accessible on the left-side navigation. To use it, login as a school administrator, teacher or as technical support.
Click on the link for Digital Scale Tester. You should answer ‘yes’ to any questions that appear in pop-up windows.
The tester should show 0.0 lbs. weight with no one standing on it and report correct weight as soon as the user is motionless on the scale. Stand on the scale and check to see that a weight is being displayed in place of the large 0.0. If there is no change or if it is an incorrect weight, the scale is not reporting to the computer properly and you should fill out a troubleshooting repair form.
This is also a valuable test to run if you suspect that there is a difference in scale readings between your kiosks. The scale passes data that is incorporated into the pbf reading for each student. If your students have pbf readings that are unusual or unreasonable, run the Digital Scale Tester on both kiosks and submit any comparative error results on a troubleshooting repair form. For easy access instructions, see the Quick Access Guide.
liftamerica.com/download/123321_U128281__67877/clearDevices.reg
and select Save. On the resulting pop-up, navigate until the file will save on the kiosk desktop. Double-click the new link. Reply 'Yes' to any pop-up messages. When done, reboot the kiosk computer and retry the scale test.
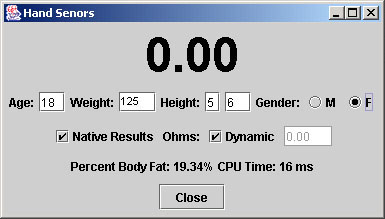
BIA (Sensor) Failed – Hand Sensor Tester
This test can be entered from this page and is also available on the Kiosk Testing page, directly accessible on the left-side navigation. To use it, login as a school administrator, teacher or as technical support.
Click on the link for the Hand Sensor Tester. You should answer ‘yes’ to any questions that appear in pop-up windows.
The tester should report 0.00 ohms before being touched and readings between 200 and 1000 when used. An average reading is between 400 and 600. Place your hands on the sensor pads and check to see that an ohms reading is being recorded in place of the large 0.00. If there is no change or if the tester showed an ohms reading prior to being touched, the sensors are not reporting to the computer correctly and you should fill out a troubleshooting repair form.
If you wish to do further testing using the Hand Sensor tester, either attach the keyboard and mouse from the computer or access the On-Screen Keyboard (see instructions above.)
The tester can be run on manual data input by unchecking the Dynamic box. (You should always leave the Native Results box checked.) Enter an age, then click on the height box to post the age entry. You should see the Percent Body Fat calculation near the bottom change accordingly. Do the same for weight and height – enter a number, then click the next box to post the entry. The gender entry posts as soon as you click it and the resulting pbf is immediately visible. If changes to the large 0.00 numbers do not appear or if the Percent Body Fat number does not change with each entry, then it is malfunctioning and you should report your actions and results on a troubleshooting repair form.
This is also a valuable test to run if you suspect that there is a difference in sensor readings between your kiosks. Enter the same numbers into each kiosk and compare that the readings are identical. The sensors pass data that is incorporated into the percent body fat reading for each student. If your students have pbf readings that are unusual or unreasonable or if the sensor countdown is slow, fast or non-existent, run the Hand Sensor Tester on each kiosk and report your actions and any error results on a troubleshooting repair form. For easy access instructions, see the Quick Access Guide.
liftamerica.com/download/123321_U128281__67877/clearDevices.reg
and select Save. On the resulting pop-up, navigate until the file will save on the kiosk desktop. Double-click the new link. Reply 'Yes' to any pop-up messages. When done, reboot the kiosk computer and retry the sensor test.
A further important note on sensors: Students can adversely affect the accuracy of sensor readings by the manner in which they place their hands on the sensor pads. They should strive to have consistent pressure each time they use the kiosk. The best results are obtained with firm pressure and relaxed elbows. Very light resting on the sensor pads produces uneven results. Leaning on the sensors, heavy pressure or stiff-arming against the sensor pads will artificially increase the ohms readout beyond the actual number. The amount of sweat or body-salt deposits on the hands also makes a difference in the readings and should be kept to a minimum.
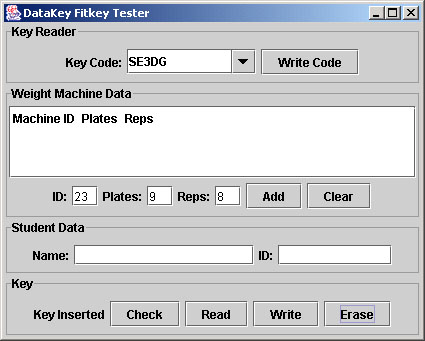
Fitkey Failed – Fitkey Tester
This test can be entered from this page and is also available on the Kiosk Testing page, directly accessible on the left-side navigation. To use it, login as a school administrator, teacher or as technical support. You will need to have a Fitkey to use in testing, preferably one with data that has already been recorded on the student’s record or data that is no longer needed.
Click on the link for the Fitkey Tester. You should answer ‘yes’ to any questions that appear in pop-up windows.
The tester window has a row of buttons at the bottom. You may check that the Fitkey reader is sensing the presence of a key by inserting a Fitkey and clicking the Check button. If a key is in the reader, but the tester returns a No Key message, then check for a firm key connection to the reader. If you re-click the Check button and it still reads No Key, retry with another key. If the Check button persistently reads No Key after tries with several different keys, report a Fitkey unit problem on a troubleshooting repair form.
For further testing using the Fitkey Tester, either attach the keyboard and mouse from the computer or access the On-Screen Keyboard (see instructions above.)
You may view the data recorded on the key by clicking the Read button. Any data on the key will display in the white box under the Machine ID - Plates - Reps columns. Test clearing the data by clicking the Erase button, then clicking Read again.
Test writing to the Fitkey by entering numbers into the boxes on the right of ID:, Plates: and Reps:. (These boxes are shown containing the numbers 23, 9 and 8 in the illustration above.) Click the Write button and the numbers will appear in the Machine ID - Plates - Reps columns. Click the Read button and the numbers should stay displayed, indicating that the numbers being read are the same ones that were entered and written.
Test adding to existing data by entering a new set of numbers into the ID:, Plates: and Reps: boxes, then click the Add button. A new row of numbers should appear under the existing ones in the Machine ID - Plates - Reps columns. Click the Write button to enter it onto the key. Click the Read button and the numbers should stay displayed, indicating that the numbers being read are the same ones that were entered and written.
If the Fitkey functions do not respond as outlined above, please detail your actions and findings on a troubleshooting repair form. For easy access instructions, see the Quick Access Guide. 

|
||||||||||||||||||||||||||||||||||||||||||||||||||||||||||||||||||||||||||||||||||||